Thursday, July 30, 2015

Fiery Pepper Jack Chicken

Living, or rather surviving, as a college student can be challenging in many aspects, but none more than having good food and eating well. If you want to go out for dinner, most college students, including my son, have the neighborhood restaurant "discount days" memorized--Tuesdays $1 Burritos, Thursdays 'all-you-can-eat' breadsticks--you get my drift! 


I love to eat out, especially in my favorite local places, like Rocks Bar & Grill in East Lakeview, Chicago, IL. For pub fare, you will get the best tater tots, delicious fresh salads (if you are eating healthy) as well as smattering of old favorites with a new twist. But, cash is frequently not available for this kind of dining during college living--at least not on a regular basis!

So, after having their 'Chicken Caliente Sandwich' the last time our son stopped by (for the third time in 2 months), I figured why not reproduce it at home, but without the brioche bun, carbs and charge. 

If you are a college student loving intense heat and flavor....this recipe is for you. 

Note: Eventhough the individual steps are simple, you will need to do multiples of them! These are easy and worth the effort


Fiery Pepper Jack Chicken

Equipment:
Grill or Grill Pan, non-stick
Large Ziplock Bags
Mixing Bowl
Baking Sheet with foil

Ingredients:

Chicken Marinade:
2 large chicken breasts, butterflied and seasoned with salt, pepper, paprika.
2 Tbls olive oil 
2 Tbls lime juice
3 cloves garlic, minced
1 Tbls sugar
1/4 tsp cumin
1 Tbls paprika
Salt & pepper


Veggies:
1/2 large onion
1 jalapeno, sliced
1/4 serrano, sliced
1 red pepper, sliced
1/2 green pepper


Pepper Jack cheese
Siracha / Thai Chili Aioli 


Instructions:
1. Wash your hands. Heat oven to BROIL.
2. Combine marinade ingredients in large ziplock bag or mixing bowl.


3. Add chicken to marinade x 1-2 hours.


4. Prep and cut veggies. 
5. Saute veggies over MEDIUM heat until slightly browned. 


6. Season w lemon, lime, salt & pepper


7. Pat chicken and season w salt & pepper.
8. Sear on grill or non-stick skillet x 5-6 min each side.


9. Schmear top of each chicken breast with thai aioli and top with veggies.


10. Top with cheese and broil x 2-3 min


If you want a bun, certainly add it, because it may help absorb the heat oils. Enjoy! 
I simply turned it into the main dish, added yellow rice and small arugula salad. 

Saturday, July 25, 2015

Supercharged Panini Sandwiches

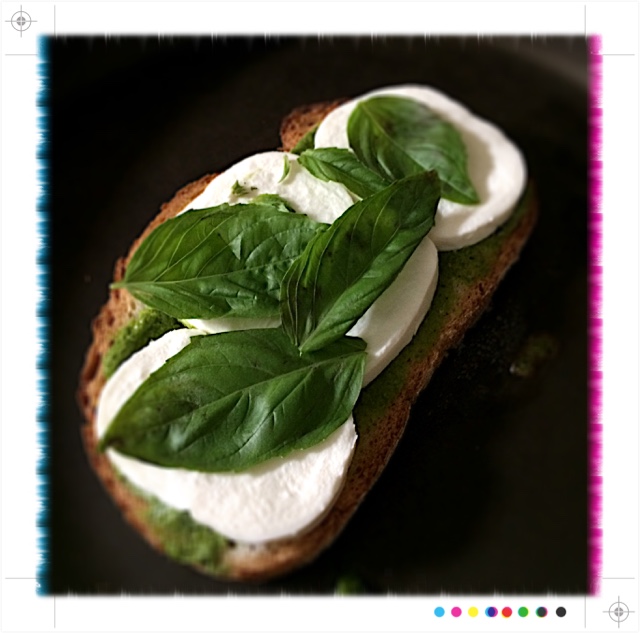
Elevate your college sandwich game with a few simple steps and variations on an old favorite! No reason the Classic 70s Grilled Cheese can't be infused with International (in this case, Italian) flavors, right?  College meal planning is known for being limited to sandwiches, boxed mac n' cheese, and of course, ramen--most of the time, college budget constraints and limited cooking skills leave very few options; however, I would suggest, it doesn't have to be that way!


Cooking Light recently posted yet another simple way to keep your lunches interesting by suggesting the combination of Marinara & Mozzarella Grilled Cheese that further led to creating a Caprese & Pesto Grilled Cheese.  Both were incredible and offer a great alternative to your traditional options for any college student living off-campus or on their own.

Other grilled sandwich ideas to keep your tastebuds happy that you might want to try this weekend include Challah Cheddar Grilled Cheese with Green Apples & Jalapeño or the awesome Grilled PB & J Sandwich featured when I just started this blog!

Supercharged Paninis For College Cooking

Equipment:
Non-stick skillet


Ingredients:
Marinara Sauce--Homemade or Store-bought
Pesto--Homemade or Store-bought
Fresh Mozzarella Slices
Fresh Basil Leaves
Fresh Tomato slices
Butter, softened for easy spread

Italian Crusty Bread


Instructions:
1. Wash your hands.
2. Heat the skillet to MEDIUM to MED-HIGH and melt 1 tsp of butter in the pan.
3. Spread butter on outer sides of bread and marinara on inner sides of bread 


4. Place first slice of bread in the skillet, butter-side down and layer with mozzarella slices. 
(Tomato slices optional)


5. Finish with salt, pepper and a few basil leaves.


6. Top this off with your second slice of bread with marinara side face-down, butter on outside. Give this several minutes to begin softening the cheese and searing the bread.


7. After several minutes, turn the sandwich until both sides are golden brown.


8. For a more savory version, use pesto in place of the marinara sauce.


9. Stack your sandwich with mozzarella, basil and tomato. 


10. Finish with salt & pepper to create a supercharged panini for any college cook.

Sunday, July 19, 2015

Steakhouse Twice Baked Potatoes

Recently, I took a cooking class with The Chopping Block in Chicago, IL featuring a classic steak dinner with all the trimmings as well as great advice on grilling meats!


What's great about these courses is that no matter where you are at with your cooking skills, there is always something new to learn--a tip, better technique, or mastering proper form!! 

Best of all, these recipes are meant to be simple to encourage more home cooked meals all while maintaining incredible flavors--and, you realize just how good can be without the restaurant bill and tip!

I added these Twice-Baked beauties to the Spicy Grilled Chicken Thighs and Back-up Summer Salad for a great night with friends on the patio! You can, too!

Steakhouse Twice-Baked Potatoes

Equipment:
Baking sheet 
Parchment paper
Mixing bowl
Functioning Oven

Ingredients:
2 Russet Baking Potatoes
Grapeseed or Olive oil
Salt & Pepper


3 strips bacon, cooked & chopped
1/2 cup Gruyere or Sharp cheddar cheese, grated
2-3 scallions, chopped
1/3 cup 2% milk
1/3 cup Sour cream
2 Tbls butter


Instructions:
1. Wash your hands and the potatoes.
2. Preheat the oven to 375F degrees.
3. Bake the potatoes after rubbing with olive oil and sprinkling with salt & pepper on parchment lined baking sheet x 40 minutes.


4. Allow the potatoes to cool before cutting in half and scooping the flesh into a bowl.


5. Mash the potato filling with butter, sour cream and milk, and season with salt and pepper.


6. Add the bacon, cheddar, and scallions. Stir well.


7. Season the potato halves with salt and pepper.
8. Add the potato filling to each potato half and sprinkle with a little extra cheddar cheese.


9. Bake the potatoes on the baking sheet until golden brown and bubbly x 10 minutes.


Great addition to Spiced Up Turkey Burgers, Bandilicious Chicken, or Souvlaki Summer Chicken Skewers, or try the Dragon Bites!

Thursday, July 16, 2015

Back Up Summer Salad

Salads don't have to be crazy with prep time after long hours of classes, practice or working all day--and sometimes, using common ingredients in different ways makes all the difference!  It really doesn't take much to turn a simple head of lettuce into a delicious meal.


A simple mistake led to this crazy delicious salad dressing that makes all the difference when you put this salad together--the vinaigrette was accidentally mixed with the goat cheese which did not combine easily at room temp; however, when everything was brief 'nuked' in the microwave, a succulent, creamy dressing emerged! 

Give me more! Add this to any summer grilling, i.e. Grilled Spicy Chicken Thighs or Asian Flank Steak, and you will have a simple meal in seconds!

Back-Up Summer Salad

Equipment:
Large salad bowl
Small mixing bowl

Ingredients:
Romaine lettuce, chopped
Fresh strawberries, hulled and quartered
Sliced almonds
Feta or Goat cheese, diced 

Protein: grilled shrimp, chicken if you like

Dressing:
Raspberry or Strawberry Vinaigrette
2-4 oz of goat cheese or cream cheese


Instructions:
1. Wash your hands.
2. Chop, wash and dry the lettuce. Add to the large salad bowl.
3. Hull and quarter the strawberries. Add to the lettuce.
4. Sprinkle the sliced almonds and 2 oz of diced feta or dollops of goat cheese.


5. Microwave 3 oz of soft goat cheese x 20 seconds in small mixing bowl.
6. Add your vinaigrette to the goat cheese and stir well.


7. Put it all together!


Experiment with other options, i.e. add cucumbers, exchange the base vinaigrette, use a different berry or fruit such as tangerine or blueberries, find out if walnuts or pistachios are more your style!
Great way to construct a salad!

Tuesday, July 14, 2015

Spicy Chicken Thighs

Having a grill--any grill during the summer months--makes meal planning easy and healthy all at once! 


And for college living, it has got to be convenient, especially if you are having to work a summer job...the last thing thing you want to do at the end of the day is cook or spend your hard earned cash!

Cooking Light featured this delicious summer recipe perfect for college cooking! Simple, with a killer marinade that transformed the chicken meat into awesomeness;and, which was then served with a kick-ass Green Chili Herb sauce made with jalapeno, garlic and parsley---wow! 

Think about it! Try this tonight! 
Add in a Back-up Summer Salad or the Steakhouse Twice Baked Potato (coming this week) to make it more complete.
Easy on the college budget. 
Eat better!

(Adapted from Cooking Light magazine August 2015 edition)

Spicy Grilled Chicken Thighs with
Green Chili Herb Sauce

Equipment:
Large freezer bag for marinade
Grill or grill skillet
Tongs
Nutri Bullet / Blender

Ingredients:

Marinade:
2 Tbls Olive oil
2 Tbls Lime juice
3 cloves garlic, minced
1 Tbls Paprika
2 tsp Cumin
2 tsp Sugar
1 1/2 tsp Kosher salt
1 1/2 tsp Fresh pepper

8 Boneless Chicken Thighs


Green Chili Herb Sauce
1 Jalapeño, coarsely chopped
2 cups parsley, coarsely chopped
1 Tbls Lime juice
2 cloves Garlic
2 Tbls Olive oil
2 Tbls Half-and-half
Salt and pepper to taste

Instructions:
1. Wash your hands.
2. Combine all 'Marinade' ingredients in a large freezer bag.


3. Add chicken thighs and marinate at least 15 minutes. I did 1-2 hours.


4. Combine all 'Green Chili Sauce' ingredients into your blender. Pulse until smooth.


5. Preheat your grill to 'MEDIUM-HIGH' heat.
6. Allow your meat to come to room temp and pat dry with paper towels.
7. Sprinkle meat with salt and pepper while it sits.
8. When ready, grill chicken thighs x 6-8 minutes / side. Allow meat to sear UNTOUCHED.
(This will ensure a beautifully seared piece of meat). No touchy.

9. Plate the chicken thighs with green-chili sauce after the meat has 'rested' x 5 min.  


You got yourself an incredibly satisfying dinner tonight! Just add a few sides and friends for some great conversation!