Showing posts with label eat better. Show all posts

Thursday, April 19, 2018

Couscous with Dried Fruits & Nuts

Simply eating a handful of nuts is going to get old sooner or later no matter how healthy you might want to be. So, having other ways to sneak a handful of nuts into your eating and fueling habits is key.


Side dishes are the perfect answer for you nut dilemma. Use bulgur wheat or couscous for this Mediterranean-inspired 'salad' packed with dried fruits, creamy feta, nuts, and, when in season, pomegranate arils. One of my favorite dishes for sure.

Walnuts have the highest alpha-lenolenic acid (ALA) and polyunsaturated fat content amongst nuts; thus, making it a great source for healthy plant-based fats and omega-3-fatty acids. However, they can also taste bitter at times..and then, nuts are omitted...don't do that!.

As an alternative, I will occasionally substitute cashews or pistachios which have a smoother, buttery and richer flavor profile along with a lower total fat content; but, unfortunately, have a significantly lower concentration of polyunsaturated fats. Just choose one!

Couscous with Dried Fruit & Nuts


Ingredients:
  • 1 cup couscous
  • 3-4 cups vegetable broth, hot
  • 1 cup of toasted walnuts, pistachios, almonds or cashews 
  • 2 oz block feta, crumbled or cubed
  • 1/2 cup pomegranate arils
  • 1/3 cup dried cherries
  • 1/3 cup dried dates, diced
  • 1/2 cup green scallions, thinly sliced
  • 2 Tbls fresh mint
Dressing:
  • 1 medium apple, finely diced
  • 1/3 cup lemon juice
  • 2-3 Tbls olive oil
  • 1-2 Tbls honey
  • 1/2 tsp salt
Instructions:
  1. In a glass bowl, cover couscous with vegetable broth to 1/4" above the grains.
  2. Let stand x 20 min. 
  3. Whisk lemon juice, olive oil, honey and salt. Adjust for sweet and salt to taste.
  4. Finely dice the apple and marinate in the lemon-honey vinaigrette.
  5. Fluff couscous and add nuts, pomegranates, dried fruits, scallions, and feta.
  6. Separate the apples from the vinaigrette and add them to the couscous.
  7. Taste the salad at this point. 
  8. I actually add very little of the vinaigrette because it is already so flavorful, but you decide how moist you want the salad to be.
___________________________________________

Money Saving Coupons for College Living.


Save $1.00 on any TWO (2) good culture(TM) Cottage Cheese. Unlock when you complete 1 good culture™ activity.


Save $1.00 when you spend $3.00 or more on Hodgson Mill® Products. Unlock when you complete 1 Hodgson Mill, Inc. activity.

Save 55¢ on Any ONE (1) Hodgson Mill® Product

Save $1.00 on any ONE (1) Mary's Gone Crackers product

any ONE (1) tube of Musician Tested, Dermatologist Recommended ChopSaver Lip Care. Available at CVS/pharmacy and other fine retailers.

RectiCare Anorectal Cream (30g). Unlock when you complete 1 Ferndale Laboratories, Inc activity.

Disclaimer: Some material features sponsored links.

Chocolate Almond Protein Smoothie


A great way to start your day before you 'go nuts' at work: Chocolate Almond Protein Smoothie. If you don't like eating nuts, try drinking them. 

That said, choose your 'milk' wisely. Check the content and read the labels to avoid buying nut-flavored waters with additives. I have recently discovered Elmhurst Milked. 
Their flavor is rich, they have "options" (hazelnut, walnuts, cashew, almond...even oats), and their product has a higher ratio of real nuts to water--obviously, that comes with a price. 


This recipe adds an extra boost of 'nuts' with a few tablespoons of nut butter. See what you think!

Chocolate Almond Protein Smoothie

Ingredients:
  • 1 plus 1/2 cup Elmhurst Milked Almonds almond milk
  • 1/2 cup blueberries (I prefer frozen)
  • 1/2 cup ice
  • 2 scoops Chocolate Whey Protein powder
  • 1-2 Tbls almond nut butter
  • 2 tsp vanilla
  • 2 Tbls dark (70% preferred) bittersweet chocolate chips or cocoa nibs

Instructions:
  1. Must have a Vitamix or other blender.
  2. Combine all ingredients and hit the 'POWER' button.
  3. Makes approximately 3 cups.

________________________________________________________________________

Coupons:


Disclaimer: Some material features sponsored links.

Monday, November 28, 2016

Chicken Noodle Soup Revised

Struggling to make ends meet thru the last weeks before finals and Winter break? Just trying to stay warm? Limited time to cook...or no skills at all?  This recipe hits all of the cooking excuses, i.e. no money, no time, no skills to eat good food while being a college student or living on a fixed budget!


The 15 minutes you invest in making this ultimate comfort food will be the best thing you do this week to soothe your soul, warm your heart and calm your mind, and ensure you have another meal ahead. Better yet, you could share a bowl of this meal with someone else in need of company, a break, decent conversation, or a decent meal--seriously! 

My son couldn't believe how quickly I made the soup during his recent Thanksgiving break stating he didn't make soup, "because it took too long". Bah-Humbug! Excuses.


Chicken Noodle Soup Revised
(Adapted from Cooking Light Thanksgiving Edition 2016)

Equipment:
Large 5-quart saucepan 

Ingredients:
2 Tbls extra-virgin Olive oil
1 1/2 cups of yellow onion, chopped
1 1/3 cups of carrots, thinly sliced
1 cup celery, thinly sliced
4 cups chicken stock (homemade, store-bought, or bouillons)
1 1/2 cups of water
1 Tbls white MISO (optional, but this adds so much depth)
1/2 tsp black pepper
1/4 tsp kosher salt
1 (9oz) bag of frozen cheese tortellini 
8 oz of skinless, rotisserie chicken, shredded
2-3 green onions, thinly sliced (optional)


Instructions:
1. Wash your hands.
2. Prep all of your ingredients, i.e. stock, chicken, veggies as recommended. 
3. Heat 2 Tbls of oil in large saucepan over Medium heat.
4. Add onions, celery and carrots, and sauce x 8 minutes.


5. Add Miso, stock, water, and bring to a boil. 
6. Simmer for 5 minutes.


7. Add cheese tortellini x 3 minutes.
8. Add chicken


9. Serve up a mouth-watering, hunger-curing meal in a bowl. 


10. Share some with a friend.


Tips:

  • No Money:
    • roast your own chicken
    • make your own stock from carcass
    • use regular pasta, i.e. rotini, farfalle, shells, penne, elbow
    • omit the meat
    • reduce cost to potentially less than $1 per serving
    • have a lot of mouths to feed on a fixed budget, this will help
  • No Waste:
    • soups are great for using vegetables on the verge of spoiling, especially for making the stock
    • use the chicken carcass, even if you bought the rotisserie to make an incredible stock by covering it with water, adding quartered onion, smashed garlic, and 2-3 roughly chopped old carrots / celery sticks, wilting parsley or other herbs, and some salt and pepper, 
  • No Equipment:
    • only need a large pot 
    • a knife
  • No Skills:
    • most grocery stores have any kind of vegetable pre-sliced--if you have money, this will be a super-cinch of a meal
    • can you stir stuff in a big pot and adjust the heat? then you can make this meal.
    • can you chop a few vegetables? then you can make this meal
    • can you eat with your hands and pull chicken off of the bone? then you can make this meal
  • No Health:
    • cut back on Sodium by using low-sodium broth and omitting salt if you have trouble with blood pressure, retaining water, or heart / kidney disease
    • adds vegetables into your life
    • filling meal if trying to lose weight
    • great way to have meat as "a side" 
Nutrition Info:
Servings: 6 (1 1/2 cups) 
Calories 281 / Fat 10.3g / Protein 22g / Carb 26g / Sodium 637mg / Fiber 5g / Sugars 5g
Cost:  $1.54-$1.80 / serving

Thursday, July 14, 2016

Simple Summer Flatbread

This month's focus is on eating well with as little time in the kitchen--time-efficient, cost-effective, taste-satisfying college cooking--nothing deserves this title more than this simple flatbread or pizza crust! 


Once the dough rises, it can be refrigerated 2-3 days before grilling or baking--makes enough for four personal size pizzas...each one made to your heart's content with any topping combo imaginable!

(Adapted from The Birchwood Cafe in Minneapolis, MN)

Simple Summer Flatbread

Equipment:
Mixing Bowls
Pizza Pan or stone

Ingredients:
2 tsp dry active yeast
1/2 tsp sugar
2 tsp granulated sea salt 
1 cup warm water
2-3 cups of bread flour

Red Sauce:
San Marzano Tomatoes, hand-torn in their sauce
Kosher salt, to taste

Toppings:
Fresh Mozzarrella 
Basil
Red Pepper flakes
Grated parmesan or pecorino


Instructions:
1. Wash your hands. 
2. Preheat oven to 450-500F degrees.
3. Combine water, yeast, salt, sugar and 1/4 cup of flour. Set aside.


4. Once you notice foaming of the yeast mixture, begin adding just enough flour 1/2 cup at a time until dough begins to form and become "shaggy" without being sticky.


5. Oil a large mixing bowl.


6. Place dough in oiled bowl, cover and set aside in a warm environment to let rise for at least one hour.


7. Once doubled, punch dough, turn it out on a floured board and knead with a little flour by folding dough back on itself with a little flour until no longer sticky. 


8. Divide into quarters when ready to use and stretch or roll out on lightly floured surface.


9. Transfer the flatbread to pizza pan and bake x 5 minutes before toppings.

10. Remove from oven and lightly spoon 1/4 cup of tomatoes and sauce on top--you will think it is not enough--but do not add more.

11. Add mozzarrella, parmesan, and bake at 450F degrees until sauce is bubbly and cheese begins to melt.


11. Broil for 1-2 minutes before removing and topping with basil.


Experiment with any other combos but be careful not to overload the flatbread.
Practice makes perfect!

Sunday, February 7, 2016

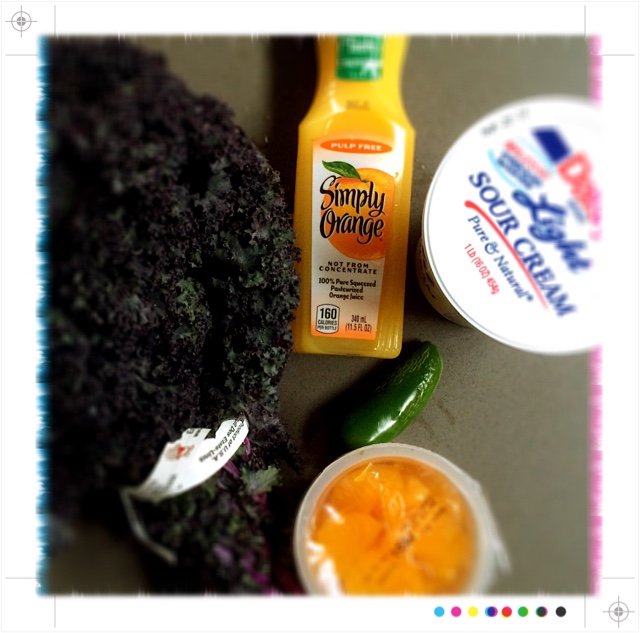
Purple Kale Citrus Salad

Everyone is eating kale--kale chips, kale (or green) smoothies, kale everything--so why miss out on this health craze? Kale has gotten a bad rap because folks don't know anything other than grinding it or roasting it with salt! It is all about the context that makes kale pop and taste delicious, i.e. how it is prepared and what it is combined with!


Kale is a simple alternative to lettuce or arugula, another option in your salad and side-dish 'arsenal' that is tasty, healthy and trendy...perfect for any college student living off campus! 

In this simple salad, the shredded kale absorbs an incredible citrus dressing that makes the whole concoction pop, awesome, and fresh--rather than just another "salad"!

(Adapted from The Pioneer Woman and her latest cookbook 'Dinnertime'. If you are in Chicago, The Pump Room makes a fantastic version of a kale salad as well!)

Purple Kale Citrus Salad

Equipment:
Mixing Bowl
Chopping Board & Knife
Whisk

Ingredients:
1 bunch fresh kale--green or purple
1 small jalapeno, thinly sliced & seeded
1 cup mandarin slices, drained
1/2 cup crumbled goat cheese or feta 
1/2 cup sliced almonds

Dressing:
1/4 cup orange juice
2 Tbls olive oil
1-2 tsp honey
1 Tbls (generous) Greek yoghurt or Light sour cream
1/2 tsp kosher salt
1/2 tsp black pepper
1 clove garlic, minced (optional)


Instructions:
1. Wash your hands.
2. Wash the kale and separate the stems from leaves.


3. Roll the leaves and slice them into thin strips until you have a nice pile of them.


4. Prep other ingredients, i.e. sliced jalapeños, drain mandarin slices, & crumbled cheese.


5. Combine your salad ingredients in a large salad bowl.


6. Make the dressing by whisking all ingredients together.

7. Combine the salad and dressing just prior to serving.


8. Here's to your health with the best of flavors and without compromise! So simple!

Wednesday, November 25, 2015

Butternut Risotto 4 College Cooking

Actually, most folks would say this recipe is the furthest thing from college cooking…and you would be correct, because this recipe is "4 Jon"; and, he has waited patiently for me to post this incredible recipe! (Risotto requires patience and preparation, so I certainly understand your concerns seeing this on a college blog!)


Having said that, it remains one of Jon's favorite dishes; and, risotto is one of the most versatile meals you can master--this is one of the best comfort foods there is; and, when a bag of arborio rice makes enough for 4 separate meals to easily feed 4 hungry college students with leftovers…this is worth adding to your recipe box. 


Risotto is merely a vehicle for any combination of ingredients you like--chicken & mushroom, mushroom & leek, peas & proscuitto, or Summer Corn--but you must learn the process of making the base! That is the key to making great risotto! We had him make his first batch of risotto upon arriving home for the Thanksgiving holidays...that is the best way to learn making risotto, or anything, right? Hands-On!

Definetely a recipe where practice makes perfect...so get started!!! 


(Adapted from Ina Garten's Roasted Butternut and Saffron Butternut Risotto recipes, but modified with skills I have learned over the years)

Roasted Butternut Risotto

Equipment:
For Roasting:
  • Baking sheet with edges
  • Mixing bowl for tossing risotto
For Risotto:
  • Large saucepan, ie 5 quart
  • Wooden spoon with a flat end (ideally)
  • Medium saucepan or bowl to hold warm broth

Ingredients:
Roasting Butternut:
  • 1 butternut squash, peeled, seeded and cubed
  • 2 Tbls olive oil
  • Salt & Pepper
  • 1-2 tsp dried thyme
Risotto:
  • 1 Tbls olive oil
  • 2 Tbls Butter
  • 1 shallot, finely sliced & chopped
  • 1 1/2 cups Arborio Rice
  • 6 cups chicken or veggie broth, warmed
  • 1/2 to 2/3 cup white wine
  • Fresh ground pepper
  • 1 cup parmesan


Instructions:
Roasting Butternut:
  • Preheat oven to 400F degrees
  • Toss butternut squash cubes in 1-2 Tbls olive oil
  • Sprinkle with salt, pepper, and thyme.
  • Spread in single layer on baking sheet.
  • Roast x 30-35 minutes or until tender
  • Make this earlier in the day if need be or the day before.


Making Risotto:
1. Wash your hands.
2. Heat the olive oil and butter in 5 quart saucepan and sear the shallots until translucent.
3. Add the risotto and make sure the rice is coated in oil-butter mixture. 
4. Stir x 1-2 minutes.
5. Add enough broth to cover the risotto and bring to a boil.
6. Reduce heat to MEDIUM-HIGH until bubbly. 
7. Stir fairly continuously until broth reduces and risotto is visible, peaking thru broth.
8. Repeat the process of adding broth and reducing it x 4-5 times.
9. After the 4th addition of broth has been reduced, add 1/2-2/3 cup of white wine.
10. Add the fresh ground pepper and continue stirring. Adjust salt and flavors.
11. Once you are satisfied with "done-ness" of rice, i.e. soft, tender, but not mushy, remove the pan from the heat and stir in the butternut and cheese.


A creamy, delicious mixture of ultimate comfort food is now ready to eat!