Showing posts with label easy recipe. Show all posts

Saturday, February 14, 2015

Blueberry Coconut Muffins

Happy Valentine's Day, Everyone!


What could be better than a little sweetness on Valentine's Day? Celebrate your favorite people, friends, family, spouses, and partners this weekend with these little bites of goodness! Not sappy sweet. Just a little. Great for breakfast with a little jam.

Some simple steps involved. Just stay organized.
Make someone feel special this weekend! 
Make someone happy!

Blueberry Coconut Muffins

Equipment:
Mixing bowls
Spatula
Sifter (use a strainer if you dont have one)
Cupcake or Muffin tin
Cupcake holders


Ingredients:
2 cups plus 1 Tbls all-purpose flour
1 Tbls baking powder
1/2 cup sugar
3/4 tsp kosher salt
1/2 cup flaked coconut, toasted
1 egg, beaten
4 Tbls butter, melted and slightly cooled
1 cup whole milk
1 1/2 cups blueberries, tossed in flour 
(if using frozen, thaw and drain first)
1 tsp orange zest (optional, but worth it)

Icing:
1 cup powder sugar
3-4 tsp milk, added individually
Orange zest (optional)


Instructions:
1. Wash your hands. 
2. Preheat oven to 400F degrees. 
3. Toast your coconut to a golden brown.


4. Sift flour, baking powder and salt. Stir in sugar and toasted coconut!


5. Combine milk, egg and melted butter (slightly cooled!!!!) until just incorporated. It will cook the egg if you do not let it cool.


6. Toss blueberries in 1 Tbls of flour and fold into the batter.


7. Fill muffin cups to below the rim.


8. Bake for 17-20 min or untl toothpick comes out dry/clean--will depend on oven. 


9. If so inclined...make the icing for a little extra sweetness and drizzle over your muffins!


10. These are great and low on sappy sugary sweetness and oily residue!

Happy Valentine's Day!!!


Sunday, January 4, 2015

Avgolemono Soup

Happy New Year Everyone!

I have thoroughly enjoyed the holidays and time off from my usual obligations! But, it is time to get back to work and putting up new recipes and ideas as you prepare to head back for the semester and off-campus living!


After all the excitement, and Hallmark movie marathons, have passed, we settle back into our usual routines...and to some degree we need to, right? Life goes on, class assignments are due, term papers need to be written, bills to be paid, and New Year's resolutions to tackle (and survive the cold winter days until Spring).

To counter 'the routine' of the upcoming months, I will be sifting thru the many cookbooks I received this Christmas, having friends over to try new flavors, and looking for recipes most compatible with college living, cooking skills and budgets!

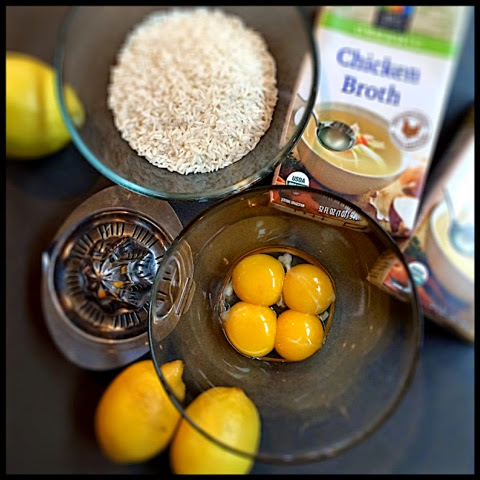
Check out this awesome recipe of the classic Greek Chicken & Lemon Soup, or Avgolemono, that will warm your soul as you head into January 2015! Jon (my son) and I always ordered this at the Greek Restaurant in our neighborhood; and, when it recently closed...well, had to find another option!!

(Adapted from This Is A Cookbook by the Sussman brothers)

Avgolemono


Equipment:
5 quart stock pot
Lemon juicer


Ingredients:
10 cups Chicken broth
2 1/2 cups long grain white rice
1 rotisserie chicken, meat removed
4 egg yolks
Juice of 3 lemons
Salt & Pepper


Instructions:
1. Wash your hands. 
2. Bring broth to a boil and add rice. Reduce heat to a simmer.


3. Simmer rice until rice tender, approx 20 min.


4. Remove 2 cups of broth to cool slightly. Set aside.
5. Add the chicken meat to broth and rice. Stir to combine.


6. Whisk the egg yolks in a small bowl, and very, very, very slowly, begin adding warm (not piping hot) broth to egg yolks.

TIP: If you do not take this slow, you will have scrambled, curdled eggs.


7. You should have a beautiful light yellow liquid in front of you!


8. Add the egg-mixture to the soup.


9. Squeeze lemon juice, approx 1/2 cup, and add to soup. I suggest doing this slowly to balance the lemon to your taste!


10. Season to taste with salt and pepper! 


Tell me you can't find your comfort zone with this soup and a good book or movie!


Saturday, October 18, 2014

Chili Relleno Rice

Fall has definitely hit the Windy City this weekend--leaves are falling and changing colors, pumpkins are being carved, and everyone is drinking "Spiced"-something-Lattes. The days are getting shorter and everyone seems to be staying inside more. But, it doesn't have to be all dreary.
Make the most of your weekends.

A little prep goes a long way on a dark and cold night, or after a long day of studying / classes or mid-terms.  Plan your meals. Cook ahead for the week. And thank me later for taking my advice. Have something you can pop into the oven or microwave when you get home--nothing worse than having to walk to the store when it's rainy, damp or cold.


Rice bakes are ideal for this, and this recipe rocks the house--one of our favorites. If you already have leftover rice from another meal--ultra-simple! But, even if you do need to make the rice, so what...that'll take 20 minutes plus some cooling. And then you will throw, yes THROW, the recipe into one big bowl which will take another 20-30 minutes max.  

Spicy.
Cheesy.
Comfort.
At Its Best.

Sear some chicken while this bakes. Add a salad.
Sit down and relax!
I suspect you will be able to charge a dinner fee for this one when your roommates come home!

(Adapted from Tyler Florence's Family Meal cookbook. Original recipe Christina Flach)

Chile Relleno Rice

Equipment:
Large Mixing Bowl
Oven
9" x 13" Pyrex Oven-proof dish

Ingredients:
5 cups cooked white rice
1 1/2 cups reduced-fat sour cream
1 can condensed Cream of Chicken soup
2 (7oz) cans diced mild (or spicy) green chiles
2 cups cubed Monterey Pepper Jack cheese
Salt & Pepper to taste


Instructions:
1. Wash your hands. 
2. Preheat oven to 375F degrees.
3. Make the RICE if you haven't got leftovers.


4. Combine cooled rice, sour cream, soup, green chiles and cheese in a large mixing bowl.


5. Add salt and pepper to taste.


6. Lightly grease pyrex dish or spray with PAM.


7. Add rice mixture.


8. Bake @ 375F degrees x 20-30 minutes until golden brown.


Wednesday, March 26, 2014

Key Lime Delight

Of all the pies that Jon loves, Key Lime Pie has got to be one of his favorites. No matter how stuffed he is...if Key Lime Pie is on the menu he's getting a slice!  So, I am honoring his request to post his favorite dishes and recipes--and why not, it doesn't get any easier than this!

If you buy the graham cracker crust, this takes 10 minutes max to prep and 15-18 minutes to bake--the hardest part is letting it set up for 2 hours after you've baked it! You thought a college student couldn't make pie? Think again!


I have gone ahead and demo-ed "How-To-Make-Your-Own-Graham-Cracker-Crust", but if time is of essence, buy one instead!

(Adapted from 'The Pioneer Woman's Holiday Cookbook')

Note:
--If using a larger (12" diam.) or deeper pie dish, you should make a double batch of the custard filling!
--If you don't have a pie plate, use your 9"x 13" rectangular baking dish and double the filling!
--save the egg whites for breakfast.

Key Lime Pie

Equipment:
Mixing bowls
'Fine' side of regular grater (or zester)
Whisk
Regular Pie Plate (or buy the pre-made one, usually 8"-10" diameter)

Ingredients:
1 Store-bought graham cracker crust (or homemade as below)

or Homemade :
2 Graham Cracker packets, crushed
5-6 Tbls of butter, melted
1/4 cup sugar

1 can Sweetened Condensed Milk
2 egg yolks
1 Tbls of lime zest
1/2 cup key lime juice (or use regular lime juice in a pinch)

Instructions:
1. Wash your hands.
2. Preheat the oven to 350F degrees.
3. Prepare the store-bought crust according to the package and set aside.  

Or make your own as below.

4. Crush 2 graham cracker packets (16 full cracker cookies) in a ziplock bag with a rolling pin or can.
5. In a mixing bowl, combine the crumbs with melted butter.
6. Add sugar. It should resemble a coarse meal.
7. Add the crumb mixture to the pie plate and flatten.
8. Bake the crust x 5 minutes. Set aside and cool.
9. Combine and whisk sweetened condensed milk, yolks, zest and lime juice into a smooth custard.
10. Fill the prepared crust and bake for 15-18 minutes or until custard sets.
11. Remove from oven, allow to cool.

12. Place in refrigerator x 2 hours so that pie can "set up".
13. Sit in a room with whipping cream or Redi-Whip…and enjoy a food-coma…or share some!